
 At the beginning of the month, I decided to make a special tag design for one of my friends back in Hawaii whose birthday is today. I had a bunch of those giant manilla tags that came in a special pack with some Tim Holtz Distress Inks and I thought it would be the perfect size to fit into a card and mail out.
Just sending a Papyrus card was definitely not enough (although I just adore Papyrus cards.)
This was a fun step away from working in my Moleskine, as well, and to do something that would actually go out to someone instead of something for my own pure enjoyment. (So selfish, I know!)
I started it off giving the card a good dose of Dylusions spray inks – and I did it on both the front and back. I then hit it with a swirly stencil design and then did the reverse image approach right after. I learned that I was a bit too hasty with those initial stencils – should have allowed the inks to dry a little more than they had, so the end result ended up being extremely subtle. But subtlety is a good thing, I think. It’s those faded, subtle images that remind me in ways of tasting a really good recipe and wondering “just what IS that awesome spice I’m tasting?”
After I allowed the inks to dry a little I stamped a decorative pattern with Distress ink towards the bottom edge of the card and then added a cherry blossom stamp over the top of that. Again – extremely subtle. You really have to look closely to see those two stamps.
I threw a butterfly stencil over the top of the card then and hit it with some white Dylusions spray ink and allowed the tag to dry for a bit. I put a nice thick strip of gorgeous washi tape down the right side. Part of it covered the reinforcement eyelet at the top so I used my x-acto knife to carefully cut the washi away from the eyelet, which made it look like the eyelet was adhered over the top of the washi. I glued down a strip of pretty blue chiffon fabric over the top of the washi.
It was at that point I thought to myself “Hmm, it’s a tag, it should have some kind of a tie or ribbon at the top.” I had some of this interesting fabric from some pack of blank cards I had (it was tied around the cards to keep them in a neat bundle) and I figured that would be perfect. Only it was beige in color. I knew I wanted the tie decoration to mach the rest of the card so I decided to try out spraying it with more Dylusions spray inks. The end result was absolutely beautiful.
The problem? YES. There was a problem! Ever notice how all these lovely creative women posting their how-to videos on YouTube show you how they just dive right in getting their fingers all messy with their paints and inks like it’s no problem? They show their project and how awesome it turns out. What they don’t show you is their resulting permanently-dyed fingers after – or how the hell they clean it off!
Yes, I watched many how-to’s with women swirling ribbons around in their bright spray inks, getting wonderful results, so that’s what I did. I dove in and got my fingers and fingernails so blue a Smurf would be jealous. I looked at my fingers and laughed, thinking “Hey, those YouTubers get their fingers messy and apparently can get it off really easy! I mean they don’t provide a public warning before smearing their lovely manicures with 20 gallons of pigment.”
You know what they say about assumptions, right? Well I washed my hands a good 30 times that evening afterwards, trying to get that damn ink off. I used standard bathroom hand soap, I used Dawn, I tried shampoo, and I even pulled out the heavy-duty pumice soap used for washing grease and oil off your fingers from working on a car. ALL of those, and 30 washes in, the below photo was the best I could do to remove the ink.
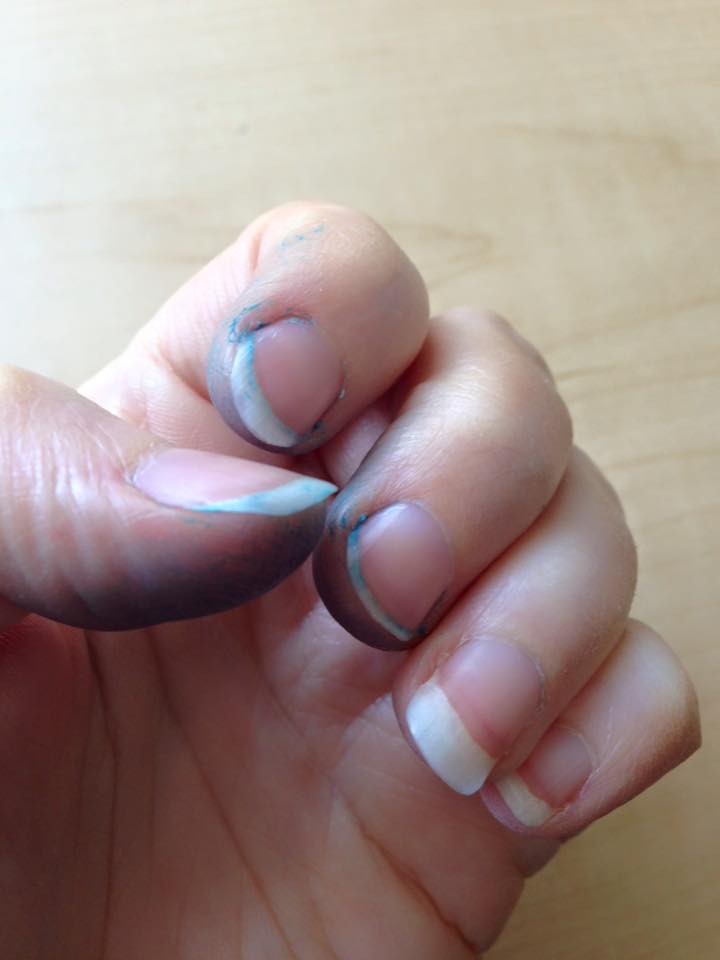
The ink eventually washed off, but I still had traces of it, especially along my cuticles and under my nails for a good week, week-and-a-half.
So – word of warning, folks. If you try this know that your skin going to get stained unless you wear protective gloves. I did find out later about a product called Art Guard, which is a cream you put on your hands to help with washing your mediums off when you’re done with your project. I do intend to purchase it. The Amazon reviews seem to be pretty positive.
Inky tirade aside, I allowed the ribbon to dry overnight (I was freakishly paranoid about touching it too soon and getting more ink all over my hands.) I tied the dried ribbon to the tag and then hand-wrote the pretty quote onto the front of the card with my trusty Gelly Roll white pen. I traced a couple of the butterfly stencils to help bring them out.
 I decided I wanted the words to pop a little better so I went over them a second time with the Gelly Roll pen and then gave them a shadowing affect using my Prismacolor Premiere colored pencils. I also wanted to give the card a little dimension so shaded along the edges of the washi tape with my colored pencils, as well.
As a final touch I used a special decorative corner punch and hit the bottom two corners of the card with it.
 I’m satisfied with how this came out, for sure. I hope my friend is pleasantly surprised when she gets it in the mail.
Hope you enjoyed the layout. I am open to comments and suggestions on how to better describe processes, etc.
List of materials:
Manilla tag
Ranger Dylusions Ink Spray
Tim Holtz Distress Ink
ColorBox Paintbox pigment ink
Stencils
Stamp
Gelly Roll pen
Prismacolor Premiere colored pencils
Washi tape
Chiffon fabric
Craft glue
Decorative corner punch

Cute tag! :) Love the colors!
LikeLike
Thank you very much!
LikeLiked by 1 person